

If you’re looking to elevate your chicken liver game, this Air Fryer Chicken Livers recipe is a must-try! Not only does it deliver bold flavor with a crispy exterior and tender interior, but it also offers a healthy, protein-packed meal that’s easy to prepare. Cooking chicken livers in the air fryer results in a perfect balance of rich taste and texture without the fuss of deep frying. Whether you’re a fan of savory snacks or need a quick, flavorful addition to your weeknight dinner, these air fryer chicken livers are sure to satisfy.

Ready to experience a dish that’s both nutritious and delicious? Let’s dive into this simple, irresistible recipe!
Table of Contents
Key Benefits of Air Fryer Chicken Livers
Air fryer chicken livers are not only a delicious treat, but they also pack a punch when it comes to health benefits! If you’ve been hesitant to try chicken livers, this recipe might just change your mind. Here’s why you should give it a go:
- Rich in Protein: Chicken livers are a fantastic source of protein, which is essential for muscle building and overall body repair. This recipe is a great option for anyone looking to add more protein to their diet without resorting to traditional meat cuts.
- High in Iron: If you’re looking to boost your iron intake, chicken livers are a perfect choice. Iron helps in the production of red blood cells, making this dish an excellent option for people looking to fight fatigue and support energy levels.
- Quick and Easy: One of the major advantages of cooking chicken livers in an air fryer is the speed. In less than 20 minutes, you can have crispy, golden livers that are tender inside. No fuss, no mess – just perfectly cooked livers ready to enjoy.
- Low in Fat: Unlike deep frying, air frying uses significantly less oil, making this a healthier alternative without compromising on that satisfying crispiness. You can enjoy all the deliciousness of fried chicken livers, but with much less guilt.
- Versatile: Air fryer chicken livers are incredibly versatile. You can season them with a variety of herbs and spices, add them to salads, or serve them as a snack. They’re perfect for a quick meal or as a fun appetizer for your next gathering.
Why You’ll Love This Recipe
This recipe isn’t just about food – it’s about bringing something bold, flavorful, and nutritious to your table. The air fryer does all the hard work, delivering crispy perfection without the extra oil and mess. Whether you’re a seasoned cook or a beginner, this easy-to-follow recipe guarantees a dish you’ll be proud to serve. And the best part? The whole family will love it!
Ready to dive in and make these air fryer chicken livers? Let’s get started!
Ingredients for Air Fryer Chicken Livers
Before we dive into the cooking process, let’s make sure you have everything you need to create these irresistible air fryer chicken livers. The ingredients are simple, and many of them might already be in your kitchen. Here’s what you’ll need:
- 1 lb chicken livers – Fresh chicken livers are ideal for this recipe. Make sure they’re cleaned and trimmed of any excess fat or connective tissue.
- 2 tablespoons olive oil – Helps achieve that crispy texture while keeping the livers tender inside. You can also use avocado oil for a lighter alternative.
- 1 teaspoon garlic powder – Adds a savory, aromatic flavor that pairs perfectly with the richness of chicken livers.
- 1 teaspoon onion powder – Brings a mild sweetness and depth to the seasoning.
- 1 teaspoon paprika – For that subtle smokiness and a vibrant color that makes the livers even more appealing.
- ½ teaspoon salt – Season to taste. You can always adjust depending on your preferences.
- ½ teaspoon black pepper – A dash of black pepper adds the right amount of heat.
- Optional: Fresh herbs (like parsley or thyme) – For a pop of freshness and extra flavor once the chicken livers are done cooking.
Pro Tip: When choosing chicken livers, look for ones that are firm, moist, and free from any unpleasant odor. Fresh livers will have a mild, clean scent.
Having everything ready before you start will make the cooking process smoother and more enjoyable. Now that you have your ingredients, let’s move on to the next step!
How to Make Air Fryer Chicken Livers
Making air fryer chicken livers is simple and quick, yielding perfectly crispy and flavorful bites that are sure to impress. Follow these straightforward steps for a delicious result:
- Clean and Prepare the Livers
Begin by rinsing the chicken livers under cold water to remove any impurities. After rinsing, use paper towels to gently pat them dry. Drying them thoroughly ensures they crisp up nicely in the air fryer. - Season the Chicken Livers
Place the chicken livers into a bowl and drizzle with olive oil. Add the garlic powder, onion powder, paprika, salt, and black pepper. Toss everything together until each liver is evenly coated with the seasoning. For an added touch of flavor, sprinkle in some fresh herbs like parsley or thyme if you’d like. - Preheat the Air Fryer
Preheat your air fryer to 400°F (200°C) for 3-5 minutes. This ensures the livers cook evenly right from the start, helping them become golden and crisp. - Cook the Chicken Livers
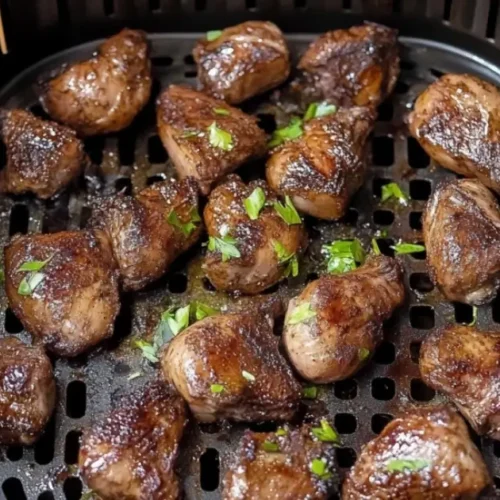
Arrange the seasoned chicken livers in the air fryer basket in a single layer. This helps the air circulate evenly around each piece. Set the air fryer to 400°F (200°C) and cook for 10-12 minutes. Be sure to shake the basket halfway through to ensure all sides get crispy and golden. - Check for Doneness
Once the cooking time is up, check the chicken livers. They should be crisp on the outside and tender inside. If they need a little more crispness, add a couple of extra minutes, but be careful not to overcook them to avoid dryness.
Pro Tip: For the crispiest results, avoid overcrowding the basket. If cooking in batches, let the air fryer cool slightly between batches to maintain the optimal temperature.
Once your chicken livers are cooked to perfection, take them out of the air fryer and allow them to rest for a minute before serving. You’re now ready to enjoy these flavorful, crispy treats!
Pro Tips and Variations
Now that you’ve got your air fryer chicken livers cooked and ready to go, let’s dive into some helpful tips and fun variations to take your dish to the next level!
1. Achieve Extra Crispiness
If you prefer your chicken livers extra crispy, try lightly dusting them with flour or cornstarch before seasoning. This adds an additional layer of crisp and texture, making them even more delightful.
2. Experiment with Seasonings
While the basic seasoning of garlic powder, onion powder, paprika, salt, and pepper works wonderfully, feel free to get creative with different spices! Here are a few options to try:
- Cajun Seasoning: For a spicy, bold kick.
- Smoked Paprika: Adds a rich, smoky flavor.
- Lemon Zest: A fresh, zesty finish.
- Italian Herbs: Basil, oregano, and thyme for a Mediterranean twist.
3. Add a Coating for Extra Flavor
For a richer flavor, you can dip the chicken livers in an egg wash before seasoning and air frying. This will create a light, golden coating that holds the seasoning better, giving each bite a burst of flavor.
4. Make Them Spicy
If you like heat, consider adding a little chili powder, cayenne pepper, or hot sauce to your seasoning mix. You can also serve the chicken livers with a spicy dipping sauce, like Sriracha mayo or buffalo sauce, for an added punch.
5. Fresh Herbs Are a Game-Changer
Fresh herbs, such as parsley, thyme, or cilantro, can be sprinkled over the chicken livers just before serving for a burst of freshness and color. Not only will they enhance the flavor, but they’ll also make the dish look even more appealing.
6. Marinate for More Depth of Flavor
For an even more flavorful dish, marinate the chicken livers in a mixture of olive oil, garlic, herbs, and spices for at least 30 minutes before cooking. This will allow the flavors to penetrate the livers more deeply, resulting in a richer taste.
Pro Tip: If you’re cooking in batches, don’t forget to shake the basket every few minutes. This ensures that each piece is evenly cooked and crisps up beautifully.
With these tips and variations, you can make your air fryer chicken livers uniquely your own, tailored to your taste preferences. Get ready to impress with these little flavor-packed bites!
Serving Suggestions
Now that your air fryer chicken livers are perfectly crispy and bursting with flavor, it’s time to think about how to serve them. These little bites are incredibly versatile and can be paired with a variety of sides and dips. Here are a few serving suggestions that will elevate your meal:
1. Pair with Fresh Salad
A fresh, crisp salad is the perfect balance to the richness of the chicken livers. Consider a simple mixed greens salad with a tangy vinaigrette. The brightness of the dressing will complement the savory flavor of the livers beautifully. Add some sliced cucumbers, cherry tomatoes, and red onions for extra crunch and color.
2. Serve with Dipping Sauces
Dipping sauces add an extra layer of flavor and fun to your chicken livers. Here are some ideas:
- Garlic Aioli: A creamy and garlicky sauce that pairs perfectly with the crisp texture of the livers.
- Spicy Honey Mustard: The sweetness of honey mustard with a kick of heat makes for a delicious contrast.
- Ranch Dressing: A classic option that never goes out of style.
- Buffalo Sauce: If you’re a fan of spicy flavors, buffalo sauce adds a fiery kick.
3. Serve as a Tapas-Style Appetizer
Air fryer chicken livers make a great appetizer for a tapas-style meal. Serve them with a selection of olives, cheese, and crusty bread to create a delightful spread. This is a perfect option for gatherings or a casual meal with friends.
4. Enjoy with a Side of Rice or Mashed Potatoes
If you’re looking for something more hearty, consider pairing your chicken livers with a side of fluffy rice or creamy mashed potatoes. The richness of the chicken livers goes wonderfully with these comforting sides, making for a well-rounded and satisfying meal.
5. Add to a Sandwich or Wrap
For a more filling meal, try placing your cooked chicken livers in a sandwich or wrap. Layer them with greens, cheese, and a creamy spread for a delicious lunch or dinner. You could also add some sautéed onions and bell peppers for an extra boost of flavor.
6. Serve with a Cold Drink
Don’t forget to serve your air fryer chicken livers with a refreshing drink! A chilled glass of white wine, iced tea, or even a cold beer can be the perfect accompaniment, balancing the rich flavors of the dish.
Pro Tip: When serving chicken livers as an appetizer, consider placing them on a serving platter and garnishing with fresh herbs like parsley or thyme for a touch of elegance.
With these serving suggestions, your air fryer chicken livers will shine as a delicious and versatile dish, perfect for any occasion. Whether you’re enjoying them as a snack, appetizer, or main course, there’s no wrong way to savor these crispy, flavorful bites!
Recipe Recap: Air Fryer Chicken Livers
Ingredients
- 1 lb chicken livers
- 2 tablespoons olive oil
- 1 teaspoon garlic powder
- 1 teaspoon onion powder
- 1 teaspoon paprika
- ½ teaspoon salt
- ½ teaspoon black pepper
- Optional: Fresh herbs like parsley or thyme
Instructions
Clean and Prepare the Livers
- Begin by rinsing the chicken livers under cold water to remove any impurities. After rinsing, use paper towels to gently pat them dry. Drying them thoroughly ensures they crisp up nicely in the air fryer.
Season the Chicken Livers
- Place the chicken livers into a bowl and drizzle with olive oil. Add the garlic powder, onion powder, paprika, salt, and black pepper. Toss everything together until each liver is evenly coated with the seasoning. For an added touch of flavor, sprinkle in some fresh herbs like parsley or thyme if you’d like.
Preheat the Air Fryer
- Preheat your air fryer to 400°F (200°C) for 3-5 minutes. This ensures the livers cook evenly right from the start, helping them become golden and crisp.
Cook the Chicken Livers
- Arrange the seasoned chicken livers in the air fryer basket in a single layer. This helps the air circulate evenly around each piece. Set the air fryer to 400°F (200°C) and cook for 10-12 minutes. Be sure to shake the basket halfway through to ensure all sides get crispy and golden.
Check for Doneness
- Once the cooking time is up, check the chicken livers. They should be crisp on the outside and tender inside. If they need a little more crispness, add a couple of extra minutes, but be careful not to overcook them to avoid dryness.
Notes
- Calories: 180 kcal
- Fat: 9g
- Saturated Fat: 2g
- Cholesterol: 250mg
- Sodium: 350mg
- Carbohydrates: 2g
- Fiber: 1g
- Sugar: 0g
- Protein: 24g
Conclusion
And there you have it—crispy, flavorful air fryer chicken livers that are as delicious as they are easy to make! This recipe is perfect for those who want to enjoy the rich taste of chicken livers without all the fuss. The air fryer helps achieve a perfectly crisp exterior while keeping the inside tender and juicy.
Whether you’re preparing them for a casual weeknight meal, a dinner party, or as a fun appetizer, these chicken livers are sure to impress. The best part is, they’re versatile enough to pair with a variety of sides and dips, allowing you to customize the dish to your tastes.
I hope you’re excited to give this recipe a try! Don’t forget to share your experience with me. If you have any questions or feedback, feel free to leave a comment below or reach out on social media. Happy cooking!
FAQs
To ensure your cooking experience goes smoothly and you get the best results with your air fryer chicken livers, I’ve answered some of the most common questions people have about this recipe. If you’re still wondering about anything, feel free to reach out!
1. Can I use frozen chicken livers?
Yes, you can! If you’re using frozen chicken livers, make sure to thaw them first. You can leave them in the fridge overnight or use the defrost function on your microwave. Once thawed, you can follow the recipe as usual. Keep in mind that frozen livers may need a minute or two longer in the air fryer, so keep an eye on them to prevent overcooking.
2. How can I make my chicken livers even crispier?
If you love extra-crispy chicken livers, try lightly spraying them with a little oil before cooking. This will enhance the crispness while keeping them tender on the inside. Also, don’t overcrowd the basket of your air fryer—leaving space between the livers allows for better air circulation and crisping.
3. Can I cook chicken livers in a regular oven?
Yes, you can cook chicken livers in a conventional oven. Preheat your oven to 375°F (190°C) and spread the livers in a single layer on a baking sheet. Bake for 20–25 minutes, flipping halfway through. Keep an eye on them to ensure they don’t overcook.
4. What are the best seasonings for chicken livers?
The beauty of chicken livers is their versatility! While this recipe calls for simple seasoning, feel free to experiment. Some delicious options include:
Paprika for a smoky flavor.
Cayenne pepper for a bit of heat.
Garlic powder or fresh minced garlic for added richness.
Thyme or rosemary for an earthy, herbaceous note.
5. Can I serve air fryer chicken livers to kids?
Absolutely! Air fryer chicken livers can be a great snack or meal for kids, especially if you keep the seasoning mild. Just be sure to check for any bones, as small bones may be present in the livers. Cutting them into bite-sized pieces can make them more kid-friendly.
6. How do I store leftovers?
If you have any leftover air fryer chicken livers, store them in an airtight container in the fridge for up to 2 days. To reheat, you can use the air fryer again, heating at 350°F for about 5 minutes to restore their crispiness. Alternatively, you can also reheat them in the microwave, though they might lose some of their crunch.
7. Can I make this recipe gluten-free?
Yes! The recipe is naturally gluten-free, as long as you avoid any breading that contains gluten. This is a perfect option for those following a gluten-free diet, as it’s both tasty and nutritious.
8. How can I make air fryer chicken livers spicy?
If you love spicy food, add some heat to your chicken livers with chili powder, cayenne pepper, or even a drizzle of hot sauce before cooking. You can also mix some sriracha or buffalo sauce into the seasoning for a spicy twist.
I hope these FAQs help clear up any lingering questions! Air fryer chicken livers are incredibly versatile and can be customized to suit your tastes. Don’t hesitate to get creative with the flavors and serving ideas to make them your own!